Friday, October 28, 2011

Leatherwork

In non-Halloween related crafting news, I finally finished a leather cuff that isn't a magic braid! (A magic braid is where the leather bracelet is braided even though it is all one intact piece.)

I started a few months back gathering the leather scrap bags from Joann's and Michael's and working a bit with the pieces available from them. I made about ten magic braid bracelets and then kind of lost interest.


I picked the idea up again when I was bored on the weekend and trying not to spend money (grad student, remember?) and dug in to the grocery bag of leather and suede remnants. Most of the remnants are from the furniture industry, so you never really know what you'll get from a grab bag. One bag has some very nice thin navy leather and some thicker black suede that I fell in love with, and another bag has some grey-ish deerskin leather in various thicknesses.

I decided first to get out the cookie cutters and cut out some leaf shapes (in three different sizes) and see what I could use them for. I ended with two pair of earrings. (Sorry for the crazy-busy counter top, I'll work on that next time.)


and


Then I went digging through the jewelry box to see what else I could scrape up in between BSG episodes. I found a chromium chain I bought years ago for a costume, and found in my "make jewelry box" a cute little heart lock.

I measured the length of black suede I needed to wrap around my wrist like a cuff and cut out a rectangle (I used another cuff as a template for the width, I didn't want it impractically bulky) and cut small strips from the scrap suede. Then I got my handy dandy leather hole punch (it's awesome!) and set holes at the top and bottom of the cuff every few inches, and made the same holes in the strips. Then I set rivets into the suede cuff and strips(way more fun than it should be) and ran the shiny chain through the loops. Add the heart lock, and sit back to admire!


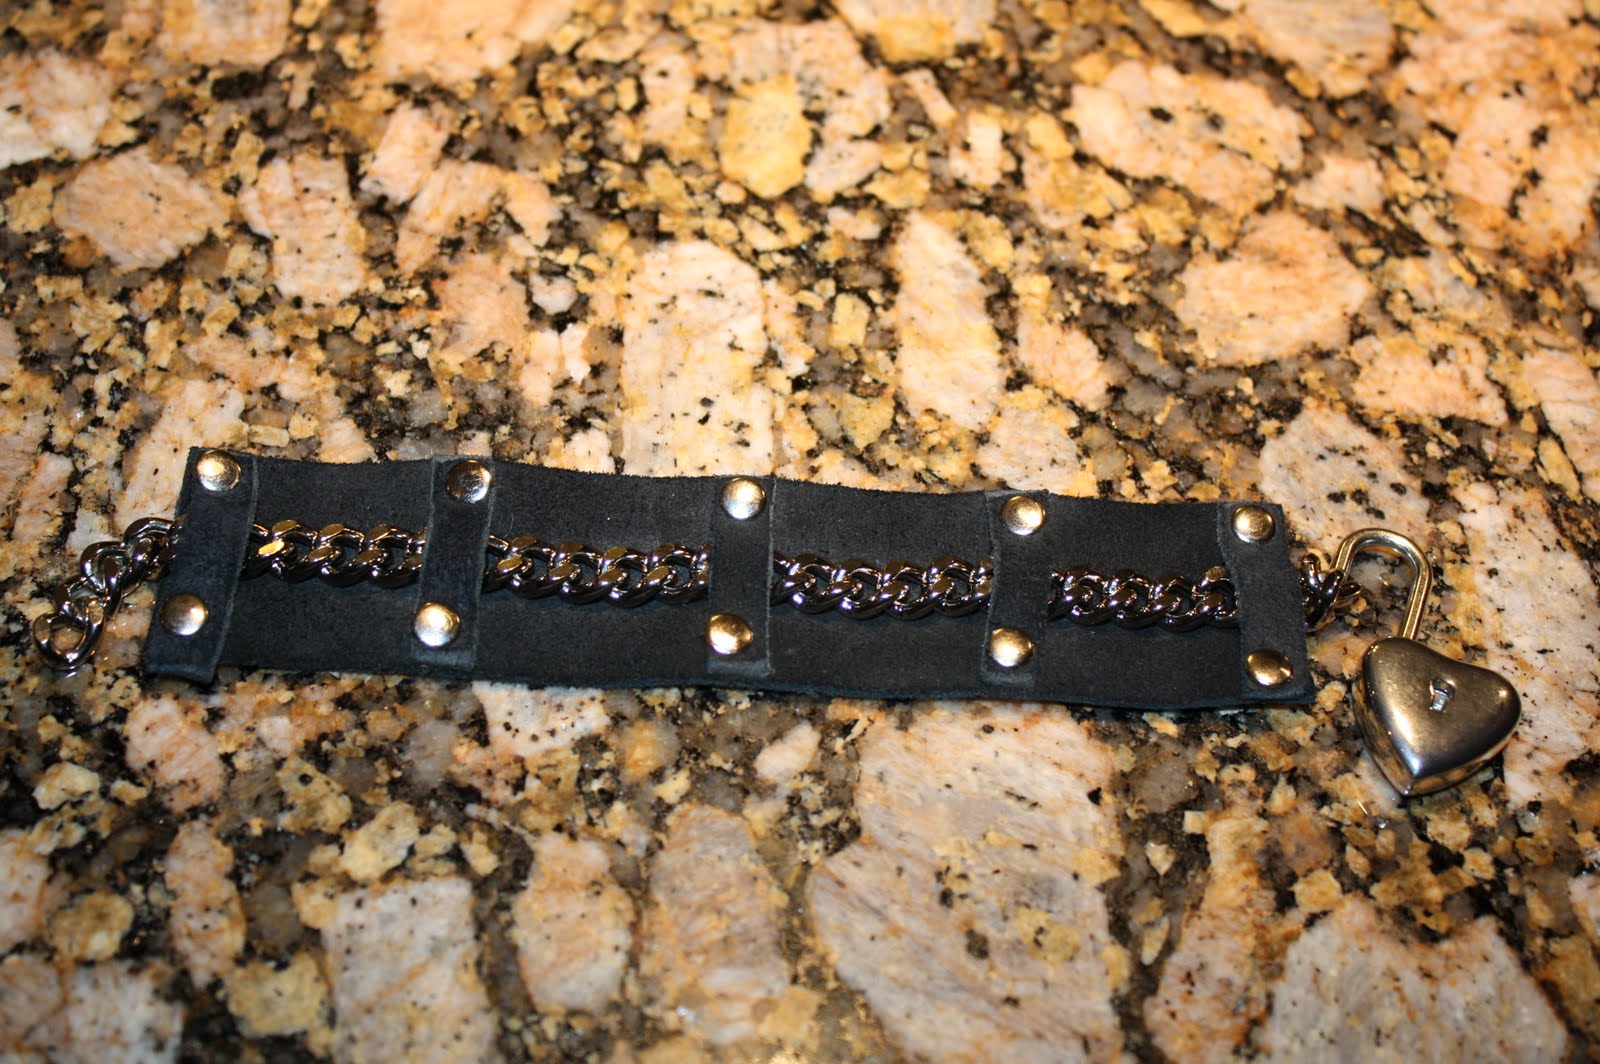
I think I may change the lock to a regular clasp at some point, because it makes the shiny cuff look a bit too gothy for me, but it's going to be a challenge to find a lobster clasp large enough to handle the chain. Overall, I'm pretty impressed with the riveting, even though most are horribly crooked. For my first time with an anvil, anvil cap, hammer, and small bits of leather I deem it a success.

I began working on another cuff the same night, and it's a good first draft idea but most certainly scrap. It's a navy leather cuff with brass rivets attaching a magic braid accent piece. My aforementioned beginner's luck with the riveting had well worn off at this point.


I like working with leather, and I hope to get some more jewelry ideas to keep it going. I don't see myself doing the leather etching, mainly because I can't draw at all, but I like the simple cutting and riveting aspect of leather. Plus it makes my house smell WONDERFUL! New car kitchen? Yes please!

Fish Tank (haa!)

So as evidenced by the last post, I'm a little (lot) Halloween crazy. And as the BIG DAY approaches, I realized I've got to finish my costume!

When I was trying to visualize the costume, I searched the magical internets for other people's costumes (which was mildly terrifying when I realized why these 50 year old men had fuzzy full-body cat costumes) and gathered ideas. I also decided to play around with an avatar creator, which I think was the most helpful thing I could have found.

I'm sure you've seen obnoxious flash ads for Zwinky and the like, but I decided to give one a try after I saw an avatar created with cat ears. So after a search or two to find a completely free avatar site, I found a whole bunch of distractions, and finally . Add a few more distractions, and tada!


That's a cute little version of what I wanted my costume to be. And I totally ripped the avatar off for my shirt. I was debating a few options, but knew I wanted black and white (I'm going to be a calico, and I'm already red). It's rather hard to see because of the small size, but the black tank on the avatar has a school of skeleton fish on the bottom side. Or possibly octopi.

So off to Walmart for me to try and budget up this shirt.

I found a simple ribbed black tank that fit surprisingly well and hid the bra straps (a must!), some puffy paint in white, stencil sponge brushes, and a plastic school folder. Most places with a craft department do sell stenciling sheets, which are flexible clear or white plastic sheets that come in an 8x10 sheet for about $1.50. While those work wonders if you're not into budget-crafting, the plastic double pocket school folders (about $0.80) offer about three times the surface area and are just as workable. I got mine in hot pink, because, well, why not? Be sure to get a color that will mark easily when you're tracing.

So back to the Bat Cave (cat cave for this? no, we'll stick to bats) and I found a stencil for a fish which is apparently part of the flying spaghetti monster religion. Regardless, it's a skeleton fish with the added bonus of pirate-y eye patch! How much more Halloween can a stencil get?

After painstakingly (not!) cutting out the paper stencil, tracing, and then cutting out the plastic stencil, I ended with two sizes of my pirate fish skeleton.


Add painter's tape, cardboard under the shirt, and puffy paint, and my fish tank is complete!


As you can see, I haven't stenciled in a few years, so it's not the crispest fish shirt ever. And the white puffy paint didn't really want to be friends with the black tank. But hey, they look ghostly. I didn't check the placement of the fish before I stenciled, which may come back to bite me, but I'm fairly certain I avoided the fishy boob conundrum. We shall see!